
Step 6: Quick Look at IOS-XR Service-Layer API
Have a look at the set of Service-Layer learning labs on DevNet for more details on the Service-Layer API, associated configuration, details on writing your own gRPC clients in pythonm, c++ and more. https://learninglabs.cisco.com/modules/iosxr-service-layer
What is the Service-Layer API ?
Let’s focus on the Service Adaptation layer from the earlier breakdown of the stack:
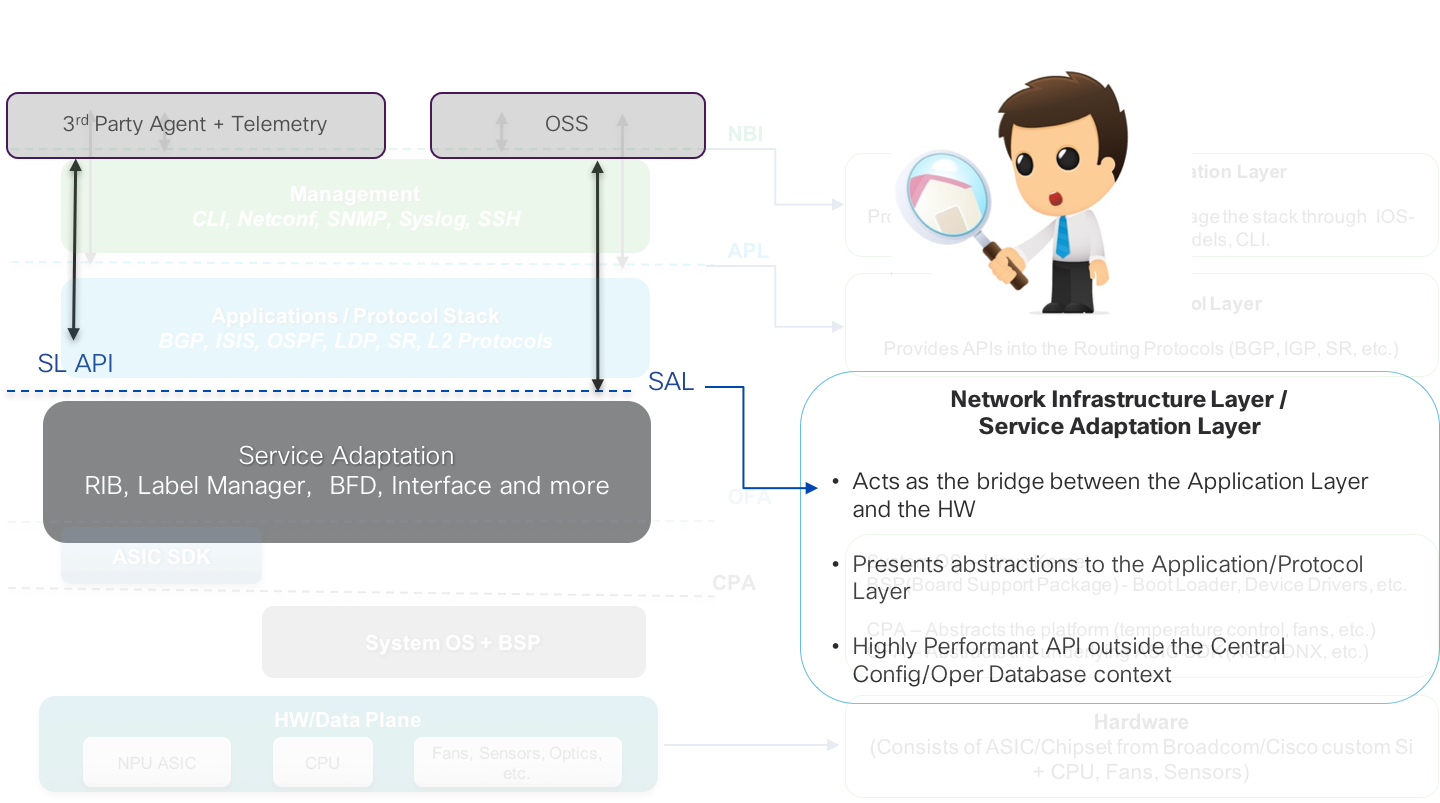
The API offered to the end-user by the Service Adaptation layer is called the Service-Layer API. This API is quite distinct from the Management/Manageability layer APIs (CLI, Yang Models, Telemetry) in the sense that these APIs are not tied to the IOS-XR internal database called SYSDB. This is shown in the figure below. The Manageability Layer derives its capabilities from SYSDB - The CLI and the YANG models are essentially interaction points for SYSDB data models representing the configuration and operational state of IOS-XR features and capabilities.
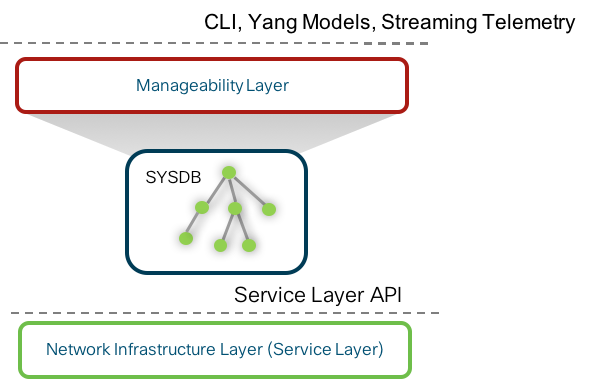
The Service-Layer API, however, is distinct. It gives the end-user access directly to the Network Infrastructure Layer (Service-Adaptation Layer), completely bypassing SYSDB.
This leads to some inherent characteristics of the Service Layer API:
By not being tied to SYSDB, the Service-Layer APIs expose just the right amount of capabilities without being tied to the “feature knobs” supported by SYSDB. You get to control the state machine within the controller/agent/app that acts as a client to the Service-Layer API.
By providing an API directly into the Network Infrastructure layer, when a client interacts with the API the number of layers that the request and subsequent calls have to traverse is lower compared to Manageability Layer APIs. As a result, Service Layer APIs are able to afford a very level of performance. We will showcase this when we utilize the API to program routes into IOS-XR RIB.
So, why do we need another API? A couple of customer(unnamed) quotes for your consumption:
“The multiple layers in the stack get in the way – We need better performance!”
“I have my own controller/protocol, just give me complete access to the infrastructure underneath”
Connect to your Pod first! Make sure your Anyconnect VPN connection to the Pod assigned to you is active.
If you haven’t connected yet, check out the instructions to do so here: https://iosxr-lab-ciscolive.github.io/LTRSPG-2414-cleur2019/assets/CLEUR19-AkshatSharma-IOS-XR-Programmability-Session-1-Friday.pdf
Once you’re connected, use the following instructions to connect to the individual nodes. The instructions in the workshop will simply refer to the Name of the box to connect without repeating the connection details and credentials. So refer back to this list when you need it.
The 3 nodes in the topology are:
Development Linux System (DevBox)
 IP Address: 10.10.20.170
 Username/Password: [admin/admin]
 SSH Port: 2211
IOS-XRv9000 R1: (Router r1)
IP Address: 10.10.20.170
Username/Password: [admin/admin]
Management IP: 10.10.20.170
XR SSH Port: 2221
NETCONF Port: 8321
gRPC Port: 57021
XR-Bash SSH Port: 2222
IOS-XRv9000 R2: (Router r2)
IP Address: 10.10.20.170
Username/Password: [admin/admin]
Management IP: 10.10.20.170
XR SSH Port: 2231
NETCONF Port: 8331
gRPC Port: 57031
XR-Bash SSH Port: 2232
The Topology in use is shown below: 
Client Code: Install gRPC and regenerate bindings
We will develop and run the service-layer python clients on the devbox. The sl-api client will connect to the router over gRPC. So, the steps we intend to perform as part of this section are:
Install the protoc compiler
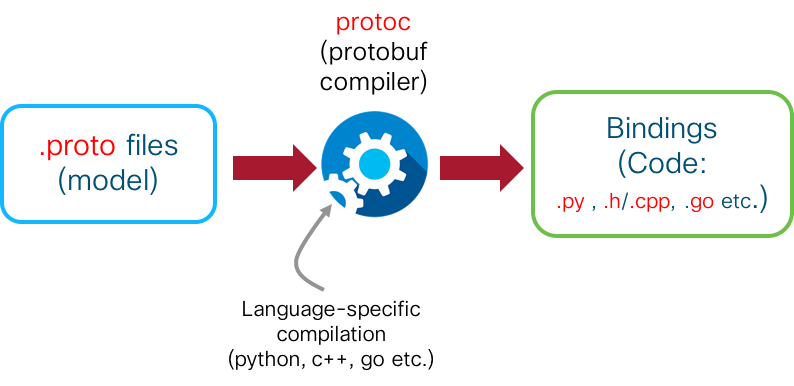
python-pipprovides protoc using agrpc-toolspackage that we intend to use. Alternativelyprotoccan be built using protobuf:3.5.0 package from github.Provide the model (.proto) files to the compiler and generate bindings (i.e. actual code in the form of .py files from the .proto files). This generated code is then used as a set of libraries to create our own client code.
The process is depicted below:
 ![protoc_compilation.png]
Connect to the Devbox
Our next set of tasks will be performed on the devbox. Connection details are explained in the beginning of this lab. SSH into devbox:
Username: admin
Password: admin
SSH port: 2211
Laptop-Terminal:$ ssh -p 2211 admin@10.10.20.170
admin@10.10.20.170's password:
Last login: Sun Aug 26 19:18:39 2018 from 192.168.122.1
admin@devbox:~$
admin@devbox:~$
Clone the Service-Layer Object Model Repository
As described in the 1st lab of this module, titled: Service-Layer APIs: Bring your own Protocol/Controller, the Service-Layer API is model-driven and uses protobuf IDLs to represent the models. These proto definitions can be found here:
https://github.com/Cisco-Service-Layer/service-layer-objmodel/tree/master/grpc/protos
Clone this git repository onto the devbox. We will clone the release v0.0.1.
admin@devbox:~$ git clone https://github.com/Cisco-Service-Layer/service-layer-objmodel.git -b v0.0.1
Cloning into 'service-layer-objmodel'...
remote: Counting objects: 402, done.
remote: Compressing objects: 100% (45/45), done.
remote: Total 402 (delta 42), reused 44 (delta 25), pack-reused 332
Receiving objects: 100% (402/402), 7.60 MiB | 3.01 MiB/s, done.
Resolving deltas: 100% (214/214), done.
Checking connectivity... done.
admin@devbox:~$
Install the Protobuf compiler
For python, the protobuf compiler (protoc) utility is packaged into the following pip-installable tool: grpcio-tools. We also need to install the tool googleapis-common-protos which contains python classes generated from protos in the googleapis repository.
These tools are identified in the instructions laid out on https://grpc.io for python client/server code generation:
https://grpc.io/docs/tutorials/basic/python.html#generating-client-and-server-code
The gRPC version that must be used for the client code is closely tied to the gRPC version used by the server code present in a given IOS-XR release. **In the IOS-XR Progammability sandbox, the routers are running IOS-XR release 6.4.1 which utilizes the gRPC version=`1.7.0`. Hence `grpcio` and the `grpcio-tools` package selected for this lab will have version=`1.7.0`**
Install grpc tools
The goal is to create bindings that are compatible for both python2 and python3 environments.
Owing to this issue:
it makes sense to generate bindings using python2 and transform them to a compatible state for python3 using the tool: 2to3.
Therefore, installing grpcio-tools and googleapis-common-protos first for python2 (use pip2 to install packages for python2):
Ignore the warnings related to pip permissions and version. They are harmless.
admin@devbox:~$ sudo pip2 install grpcio-tools==1.7.0 googleapis-common-protos
The directory '/home/admin/.cache/pip/http' or its parent directory is not owned by the current user and the cache has been disabled. Please check the permissions and owner of that directory. If executing pip with sudo, you may want sudo's -H flag.
The directory '/home/admin/.cache/pip' or its parent directory is not owned by the current user and caching wheels has been disabled. check the permissions and owner of that directory. If executing pip with sudo, you may want sudo's -H flag.
Collecting grpcio-tools==1.7.0
  Downloading https://files.pythonhosted.org/packages/0e/c3/d9a9960f12e0bab789da875b1c9a3eb348b51fa3af9544c1edd1f7ef6000/grpcio_tools-1.7.0-cp27-cp27mu-manylinux1_x86_64.whl (21.3MB)
    100% |████████████████████████████████| 21.3MB 47kB/s
Collecting googleapis-common-protos
  Downloading https://files.pythonhosted.org/packages/00/03/d25bed04ec8d930bcfa488ba81a2ecbf7eb36ae3ffd7e8f5be0d036a89c9/googleapis-common-protos-1.5.3.tar.gz
Requirement already satisfied (use --upgrade to upgrade): protobuf>=3.3.0 in /usr/local/lib/python2.7/dist-packages (from grpcio-tools==1.7.0)
Collecting grpcio>=1.7.0 (from grpcio-tools==1.7.0)
  Downloading https://files.pythonhosted.org/packages/b5/84/c0d0a0355f2e3ea1e49fd81aa123e0bf42bfaa58be56583cc3b9baaf2837/grpcio-1.14.1-cp27-cp27mu-manylinux1_x86_64.whl (9.2MB)
    100% |████████████████████████████████| 9.2MB 120kB/s
Requirement already satisfied (use --upgrade to upgrade): setuptools in /usr/lib/python2.7/dist-packages (from protobuf>=3.3.0->grpcio-tools==1.7.0)
Requirement already satisfied (use --upgrade to upgrade): six>=1.9 in /usr/lib/python2.7/dist-packages (from protobuf>=3.3.0->grpcio-tools==1.7.0)
Requirement already satisfied (use --upgrade to upgrade): enum34>=1.0.4 in /usr/lib/python2.7/dist-packages (from grpcio>=1.7.0->grpcio-tools==1.7.0)
Requirement already satisfied (use --upgrade to upgrade): futures>=2.2.0 in /usr/local/lib/python2.7/dist-packages (from grpcio>=1.7.0->grpcio-tools==1.7.0)
Installing collected packages: grpcio, grpcio-tools, googleapis-common-protos
  Running setup.py install for googleapis-common-protos ... done
Successfully installed googleapis-common-protos-1.5.3 grpcio-1.14.1 grpcio-tools-1.7.0
You are using pip version 8.1.1, however version 18.0 is available.
You should consider upgrading via the 'pip install --upgrade pip' command.
admin@devbox:~$
admin@devbox:~$
View .proto files (models)
Let’s take a look at the .proto files that are packaged as part of the cloned repository:
admin@devbox:$ cd service-layer-objmodel
admin@devbox:service-layer-objmodel$ pwd
/home/admin/service-layer-objmodel
admin@devbox:service-layer-objmodel$ cd grpc/protos/
admin@devbox:protos$ ls -l
total 116
-rw-rw-r-- 1 admin admin  4810 Aug 27 04:40 sl_bfd_common.proto
-rw-rw-r-- 1 admin admin  6918 Aug 27 04:40 sl_bfd_ipv4.proto
-rw-rw-r-- 1 admin admin  6916 Aug 27 04:40 sl_bfd_ipv6.proto
-rw-rw-r-- 1 admin admin 23285 Aug 27 04:40 sl_common_types.proto
-rw-rw-r-- 1 admin admin  6150 Aug 27 04:40 sl_global.proto
-rw-rw-r-- 1 admin admin  8068 Aug 27 04:40 sl_interface.proto
-rw-rw-r-- 1 admin admin 17521 Aug 27 04:40 sl_mpls.proto
-rw-rw-r-- 1 admin admin  9912 Aug 27 04:40 sl_route_common.proto
-rw-rw-r-- 1 admin admin  7203 Aug 27 04:40 sl_route_ipv4.proto
-rw-rw-r-- 1 admin admin  7165 Aug 27 04:40 sl_route_ipv6.proto
-rw-rw-r-- 1 admin admin   713 Aug 27 04:40 sl_version.proto
admin@devbox:protos$ ls
Briefly, these protobuf models cover the following capabilities:
| Functionality Vertical | Proto File | Supported RPCs |
|---|---|---|
| Common across Verticals | sl_common_types.proto | Defines common data structures for all verticals, such as Error codes, Operation codes (registration, notification etc.), and structures for XR interfaces and ip-addresses. |
| Common across Verticals | sl_version.proto | Contains an enum specifying the current Version of SL-API. Current Version= v0.0.1 |
| Initialization | sl_global.proto | RPCs to fetch global information related to different functionality verticals and global limits and to create and mantain an initialization channel with IOS-XR service-layer over gRPC |
| Interface | sl_interface.proto | RPCs and data structures(messages) to get global and specific interface states, to enable/disable event notifications for specific interfaces and to register for interface state events |
| MPLS | sl_mpls.proto | RPCs to register against the MPLS vertical, allocate or delete label blocks and manipulate ILM (incoming Label Map) to forwarding function entries. It also defines all the data structures used by the MPLS vertical’s RPCs |
| Route | sl_route_common.proto | Defines data structures (messages) that are used by the Route vertical’s RPCs. These data structures include Registration objects (to register against the route vertical for a given VRF), VRF objects, and common Router and Path objects utilized by both IPv4 and IPv6 Route proto files. |
| Route | sl_route_ipv4.proto | Defines the RPC calls for IPv4 route changes (adding, deleting and getting IPv4 routes) and VRF registration - essential before one can manipulate routes in the IOS-XR RIB. |
| Route | sl_route_ipv6.proto | Defines the RPC calls for IPv6 route changes (adding, deleting and getting IPv6 routes) and VRF registration - essential before one can manipulate routes in the IOS-XR RIB. |
| BFD | sl_bfd_common.proto | Defines data structures (messages) that are used by the BFD vertical’s RPCs. These data structures include Registration objects (to register against the BFD vertical), State Objects (to identify a BFD event), Get objects and Set(Tx Interval Manipulation) Objects. |
| BFD | sl_bfd_ipv4.proto | Defines the RPCs for adding, deleting, updating, and retrieving BFD sessions: used for IPv4 BFD registrations, and BFD session operations and notifications. |
| BFD | sl_bfd_ipv6.proto | Defines the RPCs for adding, deleting, updating, and retrieving BFD sessions: used for IPv6 BFD registrations, and BFD session operations and notifications. |
Generate Python bindings
Hop into the grpc/python directory under the cloned git repo. You will find the gen-bindings.sh script.
The contents of this script are dumped below:
admin@devbox:python$ pwd
/home/admin/service-layer-objmodel/grpc/python
admin@devbox:python$
admin@devbox:python$ cat gen-bindings.sh
#!/bin/bash
#
# Copyright (c) 2016 by cisco Systems, Inc.
# All rights reserved.
#

#Clean up the Bindings first
rm -rf ./src/genpy/*
touch ./src/genpy/__init__.py

cd ../protos
printf "Generating Python bindings..."

for proto_file in *.proto
do
  python -m grpc_tools.protoc -I ./ --python_out=../python/src/genpy/ --grpc_python_out=../python/src/genpy/ $proto_file
done
cd ../python/src/genpy
2to3 -w * >/dev/null 2>&1
echo "Done"
admin@devbox:python$
It can be seen that the gen-bindings.sh script first cleans up the existing genpy/ directory where the bindings will be created and then proceeds to loop through the proto files running the protoc utility from the grpc_tools package.
Once done, the 2to3 tool is run to convert all the generated bindings under genpy/ from only-python2 to python2-and-python3 compatible.
admin@devbox:python$
admin@devbox:python$ ./gen-bindings.sh
Generating Python bindings...Done
admin@devbox:python$
Once the gen-bindings.sh script has been run, jump to the genpy folder and you should see the generated bindings:
admin@devbox:python$
admin@devbox:python$ pwd
/home/admin/service-layer-objmodel/grpc/python
admin@devbox:python$
admin@devbox:python$ cd src/genpy/
admin@devbox:genpy$
admin@devbox:genpy$ ls -l
total 384
-rw-rw-r-- 1 admin admin     0 Aug 27 03:30 __init__.py
-rw-rw-r-- 1 admin admin    83 Aug 27 03:30 sl_bfd_common_pb2_grpc.py
-rw-rw-r-- 1 admin admin 19890 Aug 27 03:30 sl_bfd_common_pb2.py
-rw-rw-r-- 1 admin admin  7457 Aug 27 03:30 sl_bfd_ipv4_pb2_grpc.py
-rw-rw-r-- 1 admin admin 25091 Aug 27 03:30 sl_bfd_ipv4_pb2.py
-rw-rw-r-- 1 admin admin  7457 Aug 27 03:30 sl_bfd_ipv6_pb2_grpc.py
-rw-rw-r-- 1 admin admin 25105 Aug 27 03:30 sl_bfd_ipv6_pb2.py
-rw-rw-r-- 1 admin admin    83 Aug 27 03:30 sl_common_types_pb2_grpc.py
-rw-rw-r-- 1 admin admin 44543 Aug 27 03:30 sl_common_types_pb2.py
-rw-rw-r-- 1 admin admin  3398 Aug 27 03:30 sl_global_pb2_grpc.py
-rw-rw-r-- 1 admin admin 16448 Aug 27 03:30 sl_global_pb2.py
-rw-rw-r-- 1 admin admin  7477 Aug 27 03:30 sl_interface_pb2_grpc.py
-rw-rw-r-- 1 admin admin 30041 Aug 27 03:30 sl_interface_pb2.py
-rw-rw-r-- 1 admin admin 10917 Aug 27 03:30 sl_mpls_pb2_grpc.py
-rw-rw-r-- 1 admin admin 45631 Aug 27 03:30 sl_mpls_pb2.py
-rw-rw-r-- 1 admin admin    83 Aug 27 03:30 sl_route_common_pb2_grpc.py
-rw-rw-r-- 1 admin admin 28853 Aug 27 03:30 sl_route_common_pb2.py
-rw-rw-r-- 1 admin admin 10197 Aug 27 03:30 sl_route_ipv4_pb2_grpc.py
-rw-rw-r-- 1 admin admin 20694 Aug 27 03:30 sl_route_ipv4_pb2.py
-rw-rw-r-- 1 admin admin 10197 Aug 27 03:30 sl_route_ipv6_pb2_grpc.py
-rw-rw-r-- 1 admin admin 20715 Aug 27 03:30 sl_route_ipv6_pb2.py
-rw-rw-r-- 1 admin admin    83 Aug 27 03:30 sl_version_pb2_grpc.py
-rw-rw-r-- 1 admin admin  2204 Aug 27 03:30 sl_version_pb2.py
admin@devbox:genpy$
It is important to understand what these bindings imply. These bindings are generated from the proto files that are described above and represent the python libraries that can be imported into your client code to provide the RPCs to be used to interact with the required functionality vertical.
Perfect! We are now ready to start running existing tutorials and analyze how to write our own.
Client Code: Running existing tutorials
In the cloned service-layer-objmodel git repo, there are several python tutorials showcasing how you can connect and utilize the various RPCs defined in the proto files (and therefore in the bindings we generated in the previous section).
Install grpcio and ipaddress packages
Before we try running the clients, install the necessary packages. The grpcio package is a must to actually create a channel and connect to the router over gRPC. As mentioned in the previous section, the version of gRPC used is 1.7.0.
The ipaddress python package (or py2-ipaddress for python2) will be used to manage ip addresses in python for some of the client examples we intend to run.
For python2
Version of grpcio=1.7.0. For python2, ipaddress module is actually py2-ipaddress. Use pip2 to install packages for python2.
admin@devbox:~$
admin@devbox:~$ sudo pip2 install grpcio==1.7.0 py2-ipaddress
The directory '/home/admin/.cache/pip/http' or its parent directory is not owned by the current user and the cache has been disabled. Please check the permissions and owner of that directory. If executing pip with sudo, you may want sudo's -H flag.
The directory '/home/admin/.cache/pip' or its parent directory is not owned by the current user and caching wheels has been disabled. check the permissions and owner of that directory. If executing pip with sudo, you may want sudo's -H flag.
Collecting grpcio==1.7.0
  Downloading https://files.pythonhosted.org/packages/44/52/e5efd5f7adcfc41967691e296df8b1a96549c8a7f0fa5cf0b23204dcca07/grpcio-1.7.0-cp27-cp27mu-manylinux1_x86_64.whl (5.7MB)
    100% |████████████████████████████████| 5.7MB 201kB/s
Collecting py2-ipaddress
  Downloading https://files.pythonhosted.org/packages/06/f2/ff20f2d2fd4757be329c8ecb81e9e7fa3bec0b65445821e3a575410cf194/py2-ipaddress-3.4.1.tar.gz
Requirement already satisfied (use --upgrade to upgrade): six>=1.5.2 in /usr/lib/python2.7/dist-packages (from grpcio==1.7.0)
Requirement already satisfied (use --upgrade to upgrade): enum34>=1.0.4 in /usr/lib/python2.7/dist-packages (from grpcio==1.7.0)
Requirement already satisfied (use --upgrade to upgrade): protobuf>=3.3.0 in /usr/local/lib/python2.7/dist-packages (from grpcio==1.7.0)
Requirement already satisfied (use --upgrade to upgrade): futures>=2.2.0 in /usr/local/lib/python2.7/dist-packages (from grpcio==1.7.0)
Requirement already satisfied (use --upgrade to upgrade): setuptools in /usr/lib/python2.7/dist-packages (from protobuf>=3.3.0->grpcio==1.7.0)
Installing collected packages: grpcio, py2-ipaddress
  Found existing installation: grpcio 1.14.1
    Uninstalling grpcio-1.14.1:
      Successfully uninstalled grpcio-1.14.1
  Running setup.py install for py2-ipaddress ... done
Successfully installed grpcio-1.7.0 py2-ipaddress-3.4.1
You are using pip version 8.1.1, however version 18.0 is available.
You should consider upgrading via the 'pip install --upgrade pip' command.
admin@devbox:~$
admin@devbox:~$
For Python3
Version of grpcio=1.7.0. For python3, ipaddress module is just ipaddress. Use pip3 to install packages for python3.
admin@devbox:~$
admin@devbox:~$ sudo pip3 install grpcio==1.7.0 ipaddress
The directory '/home/admin/.cache/pip/http' or its parent directory is not owned by the current user and the cache has been disabled. Please check the permissions and owner of that directory. If executing pip with sudo, you may want sudo's -H flag.
The directory '/home/admin/.cache/pip' or its parent directory is not owned by the current user and caching wheels has been disabled. check the permissions and owner of that directory. If executing pip with sudo, you may want sudo's -H flag.
Collecting grpcio==1.7.0
  Downloading https://files.pythonhosted.org/packages/17/69/0c06ee99a7df3814520c94014a6e0b2ee4b997f88970aca9e4c072b5672a/grpcio-1.7.0-cp35-cp35m-manylinux1_x86_64.whl (5.7MB)
    100% |████████████████████████████████| 5.7MB 7.3MB/s
Collecting ipaddress
  Downloading https://files.pythonhosted.org/packages/fc/d0/7fc3a811e011d4b388be48a0e381db8d990042df54aa4ef4599a31d39853/ipaddress-1.0.22-py2.py3-none-any.whl
Requirement already satisfied: six>=1.5.2 in /usr/lib/python3/dist-packages (from grpcio==1.7.0) (1.10.0)
Requirement already satisfied: protobuf>=3.3.0 in /usr/local/lib/python3.5/dist-packages (from grpcio==1.7.0) (3.6.1)
Requirement already satisfied: setuptools in /usr/lib/python3/dist-packages (from protobuf>=3.3.0->grpcio==1.7.0) (20.7.0)
Installing collected packages: grpcio, ipaddress
Successfully installed grpcio-1.7.0 ipaddress-1.0.22
You are using pip version 10.0.1, however version 18.0 is available.
You should consider upgrading via the 'pip install --upgrade pip' command.
admin@devbox:~$
admin@devbox:~$
Running pre-packaged tutorials
Let’s run some of the representative tutorials that are packaged along with the service-layer-objmodel git repo and see if things are working well. We will also run some commands on the router r1 (that we intend to connect to) in order to understand the effect of programming IOS-XR using the service-layer API.
List the existing tutorials
The existing tutorials are shown below in the grpc/python/src/tutorial directory under the git repo service-layer-objmodel.
admin@devbox:python$ pwd
/home/admin/service-layer-objmodel/grpc/python
admin@devbox:python$
admin@devbox:python$
admin@devbox:python$
admin@devbox:python$ cd src/tutorial/
admin@devbox:tutorial$
admin@devbox:tutorial$
admin@devbox:tutorial$ ls -l
total 88
-rw-rw-r-- 1 admin admin  5823 Aug 27 04:40 client_init.py
drwxrwxr-x 2 admin admin  4096 Aug 27 04:40 grpc_beta
-rw-rw-r-- 1 admin admin    72 Aug 27 04:40 __init__.py
-rw-rw-r-- 1 admin admin 12698 Aug 27 04:40 interface.py
-rw-rw-r-- 1 admin admin 10329 Aug 27 04:40 mpls_ilm.py
-rw-rw-r-- 1 admin admin  5435 Aug 27 04:40 quickstart.py
-rw-rw-r-- 1 admin admin 14211 Aug 27 04:40 README.md
-rw-rw-r-- 1 admin admin 12857 Aug 27 04:40 route.py
-rw-rw-r-- 1 admin admin  3617 Aug 27 04:40 vrf.py
admin@devbox:tutorial$
admin@devbox:tutorial$
All the tutorials described below, expect the following environment variables to be set before running them:
- SERVER_IP: IP address over which the router’s gRPC server is reachable
- SERVER_PORT: TCP port over which the router’s gRPC server is reachable
To set these variables, simply export them in the shell of the admin box before running the >tutorials (The tutorials will ask you to if you miss this):admin@devbox:tutorial$ admin@devbox:tutorial$ export SERVER_IP=10.10.20.170 admin@devbox:tutorial$ export SERVER_PORT=57021 admin@devbox:tutorial$
These tutorials cover the following use cases:
Basic Client Initialization: client_init.py
This tutorial utilizes the initialization RPC to set up a notification channel with the service-layer gRPC server running on the router. This notification channel is used by the client to be notified of any server error conditions or any disconnect messages. You canNOT utilize any of the service-layer functionality verticals if you don’t keep a notification channel active.
This is usually done by initiating the notification channel in a separate thread inside your code, so that the rest of code can continue to execute while the notification channel remains active within the thread. Most modern programming languages (certainly python, c++, golang) have concepts of parallel processes such as threads to enable this functionality.
client_init.py will simply connect, set up a channel and disconnect. Its init code will be run inside a separate thread in the next set of tutorials that leverage it.
Version `v0.0.1` of the Service-Layer API supports only one client connection at a time. So if another client connects to the service-layer (version `v0.0.1`), a disconnect message will be sent to the existing client over the notification channel
Run client_init.py:
admin@devbox:tutorial$
admin@devbox:tutorial$
admin@devbox:tutorial$ python3 client_init.py
Using GRPC Server IP(10.10.20.170) Port(57021)
Global thread spawned
Server Returned 0x502, Version 0.0.0
Successfully Initialized, connection established!
Max VRF Name Len     : 33
Max Iface Name Len   : 64
Max Paths per Entry  : 64
Max Prim per Entry   : 32
Max Bckup per Entry  : 32
Max Labels per Entry : 3
Min Prim Path-id     : 1
Max Prim Path-id     : 64
Min Bckup Path-id    : 65
Max Bckup Path-id    : 128
Max Remote Bckup Addr: 2
admin@devbox:tutorial$
Perfect, the client was able to connect to the Service-layer, set up a channel, glean some global limits associated with the different functionality verticals and dump them, before disconnecting.
Register/Unregister against the Route Vertical: vrf.py
This tutorial utilizes the client_init.py code to maintain the notification channel for it while it proceeds to register against a particular vrf (vrf default). This accomplishes registration for the Route vertical described earlier. Only post registration with the Route vertical can the RIB manipulations be carried out.
One must register against a functionality vertical first. Only post registration, would the RPCs for that vertical work.
Run vrf.py:
admin@devbox:tutorial$
admin@devbox:tutorial$ python3 vrf.py
Using GRPC Server IP(10.10.20.170) Port(57021)
Global thread spawned
Server Returned 0x502, Version 0.0.0
Successfully Initialized, connection established!
Max VRF Name Len     : 33
Max Iface Name Len   : 64
Max Paths per Entry  : 64
Max Prim per Entry   : 32
Max Bckup per Entry  : 32
Max Labels per Entry : 3
Min Prim Path-id     : 1
Max Prim Path-id     : 64
Min Bckup Path-id    : 65
Max Bckup Path-id    : 128
Max Remote Bckup Addr: 2
VRF SL_REGOP_REGISTER Success!
VRF SL_REGOP_EOF Success!
VRF SL_REGOP_UNREGISTER Success!
admin@devbox:tutorial$
The initial dump is the same as the earlier run of client_init.py since vrf.py utilizes client_init.py. The last set of messages show that the client was able to:
- Successfully Register for the Route vertical (for vrf:
default) - Send an EOF (used to flush out stale routes - marked by the registration process- should remind folks of the Mark and Sweep technique used in Garbage Collection algorithms. This is utilized whenever controllers/clients intend to resync routes with the IOS-XR RIB in the event of either a client or server failure.)
- Successfully Unregister for the Route Vertical (used to disconnect and flush out all the routes from the particular vrf)
Add Routes to IOS-XR RIB: quickstart.py
The quickstart.py tutorial uses vrf.py (which in turn uses client_init.py as mentioned above) to register against the Route vertical. It then utilizes RPCs in the IPv4 Route vertical to program IPv4 routes into the IOS-XR RIB.
Run quickstart.py:
 admin@devbox:tutorial$ python3 quickstart.py
 Using GRPC Server IP(10.10.20.170) Port(57021)
 Global thread spawned
 Server Returned 0x502, Version 0.0.0
 Successfully Initialized, connection established!
 Max VRF Name Len     : 33
 Max Iface Name Len   : 64
 Max Paths per Entry  : 64
 Max Prim per Entry   : 32
 Max Bckup per Entry  : 32
 Max Labels per Entry : 3
 Min Prim Path-id     : 1
 Max Prim Path-id     : 64
 Min Bckup Path-id    : 65
 Max Bckup Path-id    : 128
 Max Remote Bckup Addr: 2
 VRF SL_REGOP_REGISTER Success!
 VRF SL_REGOP_EOF Success!
 Route SL_OBJOP_ADD Success!
 admin@devbox:tutorial$
Perfect! The first few messages would remind you of the output from the vrf.py tutorial above. We do not Unregister here, but instead utilize the Route vertical to push some route objects into the IOS-XR RIB.
To verify this, ssh into the router and do a dump of the RIB using show route:
Username: admin
Password: admin
SSH port: 2221
 Laptop-terminal$ ssh -p 2221 admin@10.10.20.170
 ------------------------------------------------------------------------
 Router 1 (Cisco IOS XR Sandbox)
 ------------------------------------------------------------------------
 Password:

 RP/0/RP0/CPU0:r1#
 RP/0/RP0/CPU0:r1#show  route
 Sun Sep  2 00:49:39.882 UTC

 Codes: C - connected, S - static, R - RIP, B - BGP, (>) - Diversion path
        D - EIGRP, EX - EIGRP external, O - OSPF, IA - OSPF inter area
        N1 - OSPF NSSA external type 1, N2 - OSPF NSSA external type 2
        E1 - OSPF external type 1, E2 - OSPF external type 2, E - EGP
        i - ISIS, L1 - IS-IS level-1, L2 - IS-IS level-2
        ia - IS-IS inter area, su - IS-IS summary null, * - candidate default
        U - per-user static route, o - ODR, L - local, G  - DAGR, l - LISP
        A - access/subscriber, a - Application route
        M - mobile route, r - RPL, t - Traffic Engineering, (!) - FRR Backup path

 Gateway of last resort is 192.168.122.1 to network 0.0.0.0

 S*   0.0.0.0/0 [1/0] via 192.168.122.1, 5d13h
 a    20.0.0.0/24 [2/0] via 10.10.10.1, 00:04:31, GigabitEthernet0/0/0/0
                  [2/0] via 10.10.10.2, 00:04:31, GigabitEthernet0/0/0/0
 a    20.0.1.0/24 [2/0] via 10.10.10.1, 00:04:31, GigabitEthernet0/0/0/0
                  [2/0] via 10.10.10.2, 00:04:31, GigabitEthernet0/0/0/0
 a    20.0.2.0/24 [2/0] via 10.10.10.1, 00:04:31, GigabitEthernet0/0/0/0
                  [2/0] via 10.10.10.2, 00:04:31, GigabitEthernet0/0/0/0
 a    20.0.3.0/24 [2/0] via 10.10.10.1, 00:04:31, GigabitEthernet0/0/0/0
                  [2/0] via 10.10.10.2, 00:04:31, GigabitEthernet0/0/0/0
 a    20.0.4.0/24 [2/0] via 10.10.10.1, 00:04:31, GigabitEthernet0/0/0/0
                  [2/0] via 10.10.10.2, 00:04:31, GigabitEthernet0/0/0/0
 a    20.0.5.0/24 [2/0] via 10.10.10.1, 00:04:31, GigabitEthernet0/0/0/0
                  [2/0] via 10.10.10.2, 00:04:31, GigabitEthernet0/0/0/0
 a    20.0.6.0/24 [2/0] via 10.10.10.1, 00:04:31, GigabitEthernet0/0/0/0
                  [2/0] via 10.10.10.2, 00:04:31, GigabitEthernet0/0/0/0
 a    20.0.7.0/24 [2/0] via 10.10.10.1, 00:04:31, GigabitEthernet0/0/0/0
                  [2/0] via 10.10.10.2, 00:04:31, GigabitEthernet0/0/0/0
 a    20.0.8.0/24 [2/0] via 10.10.10.1, 00:04:31, GigabitEthernet0/0/0/0
                  [2/0] via 10.10.10.2, 00:04:31, GigabitEthernet0/0/0/0
 a    20.0.9.0/24 [2/0] via 10.10.10.1, 00:04:31, GigabitEthernet0/0/0/0
                  [2/0] via 10.10.10.2, 00:04:31, GigabitEthernet0/0/0/0
 C    192.168.122.0/24 is directly connected, 5d13h, MgmtEth0/RP0/CPU0/0
 L    192.168.122.21/32 is directly connected, 5d13h, MgmtEth0/RP0/CPU0/0
 RP/0/RP0/CPU0:r1#
Notice the `a` routes in the RIB. These were the routes pushed into the RIB by the `quickstart.py` client.
Add Routes to IOS-XR RIB: route.py
This tutorial is a combination of client_init.py, vrf.py and quickstart.py into a single piece of code. We will not run this tutorial as part of the lab but it useful to look at to see how to combine the 3 pieces of code above.
Register and Listen for interface state events: interface.py
This tutorial showcases how to register against the interface vertical, set up event streams for a certain set of interfaces and then start thread to receive notifications of interface events as we shut/no-shut registered interfaces.
Run interface.py:
admin@devbox:tutorial$ python3 interface.py
Using GRPC Server IP(10.10.20.170) Port(57021)
Global thread spawned
Server Returned 0x502, Version 0.0.0
Successfully Initialized, connection established!
Max VRF Name Len     : 33
Max Iface Name Len   : 64
Max Paths per Entry  : 64
Max Prim per Entry   : 32
Max Bckup per Entry  : 32
Max Labels per Entry : 3
Min Prim Path-id     : 1
Max Prim Path-id     : 64
Min Bckup Path-id    : 65
Max Bckup Path-id    : 128
Max Remote Bckup Addr: 2
ErrStatus {
}

ErrStatus {
}

StatusSummary {
}

ErrStatus {
}
MaxInterfacesPerBatch: 1024

Eof: true
ErrStatus {
}
Entries {
 SLIfInfo {
   Name: "GigabitEthernet0/0/0/0"
 }
}
Entries {
 SLIfInfo {
   Name: "GigabitEthernet0/0/0/1"
 }
}
Entries {
 SLIfInfo {
   Name: "MgmtEth0/RP0/CPU0/0"
 }
}

Starting listener for interface events
We register for the state events of three interfaces, namely: GigabitEthernet0/0/0/0, GigabitEthernet0/0/0/1 and MgmtEth0/RP0/CPU0/0.
You will notice that the client is still running, because it is listening for interface state events in a persistent thread. Let’s trigger the shut/no-shut of interface GigabitEthernet0/0/0/0 and see how the client reacts.
Connect to the router r1 in a separate terminal while the client is running and shut down interface Gig0/0/0/0:
Username: admin
Password: admin
SSH port: 2221
Laptop-terminal$ ssh -p 2221 admin@10.10.20.170
------------------------------------------------------------------------
Router 1 (Cisco IOS XR Sandbox)
------------------------------------------------------------------------
Password:

RP/0/RP0/CPU0:r1#
RP/0/RP0/CPU0:r1#
RP/0/RP0/CPU0:r1#
RP/0/RP0/CPU0:r1#conf t
Sun Sep  2 01:24:29.685 UTC
RP/0/RP0/CPU0:r1(config)#int  gigabitEthernet 0/0/0/0
RP/0/RP0/CPU0:r1(config-if)#shut
RP/0/RP0/CPU0:r1(config-if)#commit
Sun Sep  2 01:24:35.402 UTC
RP/0/RP0/CPU0:r1(config-if)#
Hop back to the running client, and you should notice the following message show up:
Received HeartBeat
Received HeartBeat
EventType: SL_INTERFACE_EVENT_TYPE_INTERFACE_INFO
Info {
 SLIfInfo {
   Name: "GigabitEthernet0/0/0/0"
 }
 IfState: SL_IF_STATE_DOWN
 SeqNum: 11
}
The Received HeartBeat messages show up as the client receives heartbeats periodically from the Server. The event SL_INTERFACE_EVENT_TYPE_INTERFACE_INFO gives us more information on the type of interface event received:
- It is for the interface
GigabitEthernet0/0/0/0and - It was a
DOWNevent:IfState: SL_IF_STATE_DOWN - The sequence number:
SeqNum: 11illustrates the sequence number of this event message - can be used to correlate events in a sequence of interface events (for e.g. in case of flapping interfaces).
Similarly, no-shut the interface GigabitEthernet0/0/0/0 on the router and notice the UP event being streamed to the client:
Router r1:
RP/0/RP0/CPU0:r1#
RP/0/RP0/CPU0:r1#conf t
Sun Sep  2 01:24:29.685 UTC
RP/0/RP0/CPU0:r1(config)#int  gigabitEthernet 0/0/0/0
RP/0/RP0/CPU0:r1(config-if)#no shut
RP/0/RP0/CPU0:r1(config-if)#commit
Sun Sep  2 01:24:35.402 UTC
RP/0/RP0/CPU0:r1(config-if)#
Devbox:
Received HeartBeat
Received HeartBeat
EventType: SL_INTERFACE_EVENT_TYPE_INTERFACE_INFO
Info {
  SLIfInfo {
    Name: "GigabitEthernet0/0/0/0"
  }
  IfState: SL_IF_STATE_UP
  SeqNum: 12
}
Allocate Local labels and Create ILM entries: mpls_ilm.py
This tutorial showcases how to register against the mpls vertical, allocate label blocks and then utilize these labels to create ILM (incoming label map) to forwarding function entries.
Run mpls_ilm.py:
admin@devbox:tutorial$ python3 mpls_ilm.py
Using GRPC Server IP(10.10.20.170) Port(57021)
Global thread spawned
Server Returned 0x502, Version 0.0.0
Successfully Initialized, connection established!
Max VRF Name Len     : 33
Max Iface Name Len   : 64
Max Paths per Entry  : 64
Max Prim per Entry   : 32
Max Bckup per Entry  : 32
Max Labels per Entry : 3
Min Prim Path-id     : 1
Max Prim Path-id     : 64
Min Bckup Path-id    : 65
Max Bckup Path-id    : 128
Max Remote Bckup Addr: 2
MPLS SL_OBJOP_ADD Success!
MPLS SL_OBJOP_UPDATE Success!
admin@devbox:tutorial$
Hop onto router r1 and dump the allocated label blocks:
Username: admin
Password: admin
SSH port: 2221
Laptop-terminal$ ssh -p 2221 admin@10.10.20.170
------------------------------------------------------------------------
Router 1 (Cisco IOS XR Sandbox)
------------------------------------------------------------------------
Password:

RP/0/RP0/CPU0:r1#
RP/0/RP0/CPU0:r1#
RP/0/RP0/CPU0:r1#
RP/0/RP0/CPU0:r1#show  mpls label table
Sun Sep  2 01:35:21.489 UTC
Table Label   Owner                           State  Rewrite
----- ------- ------------------------------- ------ -------
0     0       LSD(A)                          InUse  Yes
0     1       LSD(A)                          InUse  Yes
0     2       LSD(A)                          InUse  Yes
0     13      LSD(A)                          InUse  Yes
0     30000   Static(A):Service-layer         InUse  No
0     31000   Static(A):Service-layer         InUse  No
0     32000   Static(A):Service-layer         InUse  No
0     33000   Static(A):Service-layer         InUse  No
0     34000   Static(A):Service-layer         InUse  Yes
0     35000   Static(A):Service-layer         InUse  No
0     36000   Static(A):Service-layer         InUse  No
0     37000   Static(A):Service-layer         InUse  No
0     38000   Static(A):Service-layer         InUse  No
0     39000   Static(A):Service-layer         InUse  No
RP/0/RP0/CPU0:r1#
Notice the labels marked Static(A):Service-layer ? These were allocated by the mpls_ilm.py client.
Now dump the mpls forwarding entries on the router:
RP/0/RP0/CPU0:r1#show  mpls  forwarding
Sun Sep  2 01:38:58.400 UTC
Local  Outgoing    Prefix             Outgoing     Next Hop        Bytes
Label  Label       or ID              Interface                    Switched
------ ----------- ------------------ ------------ --------------- ------------
34000  10065       SR Pfx (idx 0)     Gi0/0/0/1    12.1.1.20       0
RP/0/RP0/CPU0:r1#
Perfect! This showcases a SWAP entry created by the client. This entry will receive any packet with incoming-label=34000, swap it with label=10065 and forward it to the nexthop interface GigabitEthernet0/0/0/1 and nexthop address=12.1.1.20.
Of course, you get to play with the usual mpls label operations like : PUSH, POP_AND_FORWARD, POP_AND_LOOKUP_IPV4 and POP_AND_LOOKUP_IPV6 to create ILM entries based on your use case.
Now that we've seen the various service-layer API clients in action and their effects on the Router, let's break down the actual code in the `route.py` tutorial to learn how to write a client from scratch.
Leave a Comment